

If you are logged into your router settings or running a network scan to discover what devices are currently connected to your Wi-Fi, you may notice that Apple devices such as iPhones, iPads and Smart Watches do not identify themselves on the list of connected devices.
Depending on your router or hub that you are using, these devices may show up as “Unknown Device” or “Network Device”.
What Is Private Wi-Fi Address & Do I Need It?
The reason for this is that IOS use a recently introduced feature called “Private Wi-Fi Address”. What this basically does is hides the ID of the device’s name to the router that is connected to. (Any IOS device from IOS 14 and beyond) set his to be enabled as default.
Summary of Private Wi-Fi Address in IOS
- Privacy: Enhanced privacy by preventing tracking across different Wi-Fi networks.
- Compatibility: Some networks may have MAC address filtering enabled, requiring you to use the device’s actual MAC address. In such cases, you may need to disable the Private Address feature for that specific network.
By using a private Wi-Fi address, iOS devices help protect user privacy without requiring users to change their behaviour or take additional steps. The feature was brought in as part of Apple’s broader efforts to enhance user privacy and security.
If you would like to view this as your iPhone within your router settings, there are two ways to do this. Method 1 is the method that is recommended on other websites that cover this. However I recommend Method 2, which maintains your device’s security when you are using it on other Wi-Fi networks.
Method 1
Enabling or Disabling “Private Wi-Fi Address”
This feature is typically enabled by default starting with iOS 14. However, users can manage this setting for individual networks:
- Go to Settings on your iOS device.
- Tap on Wi-Fi.
- Find the Wi-Fi network you’re connected to or want to manage and tap the info (i) button next to it.
- Toggle the Private Address switch on or off as desired.
However, in doing so, remember that Apple introduced this for a reason. It is to protect your ID on the network. (if using this at home you don’t have to worry too much). If using your device in a busy office or work environment, it allows everyone on the network to see that you are connected.
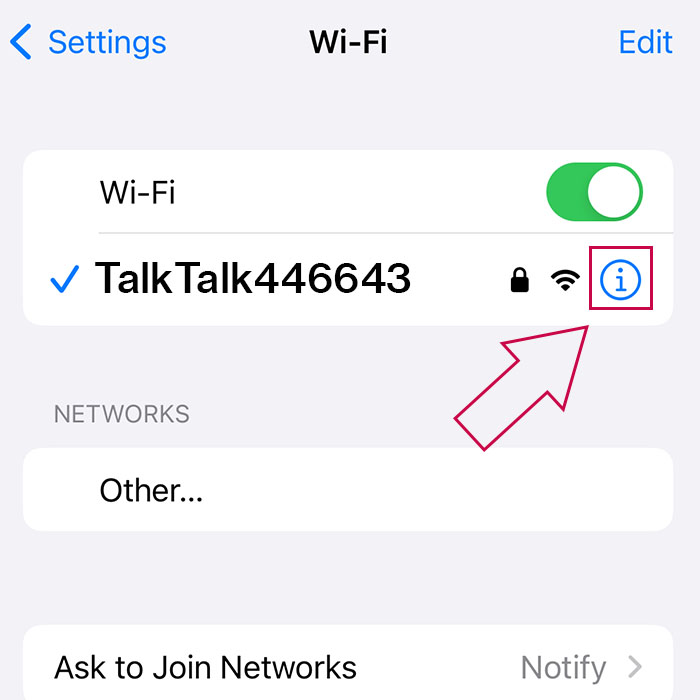

Method 2
Once logged into your router, within the list on connected devices (Device List) you should be able to edit and name each device.
To identify your specific device, look for the IP Address that the router has assigned for you. Let’s say for example the IP address is 192.168.0.45
Look on your iPhone under Settings / Wi-Fi / Info Icon / IPV4 ADDRESS and you can view which number that your device has been assigned.
Within the router settings, simply edit and rename that device, giving it a unique ID such as your initials, name or iPhone1.
So to summarize: Find out what IP Address your device has been assigned. Log in to your router and assign it a name.
Note: Using Method 2 means that only the router will have this info. Other network scanning apps and tools will still see it as Unknown Device.
Always Know Which Devices Are Connected
This can be useful to use and become familiar with for a number of reasons including disabling internet access for children after a certain time or removing unwanted users from your network.
Some routers and hubs allow you to control this from within their own App. All routers and hubs allow you to control this by logging in via a web browser.
Look for the paper sticker on the base or insert card of most routers and the login details will be there.
Normally it involves opening a web browser and typing the default gateway address (which will look something like 192.168.1.1 ) straight into the browser address bar.
End.