
Copying and pasting table content from an online website into an Office 365 Excel worksheet is a great way to gather and analyse data. However it can get messy and time consuming if you do this the “old fashioned” way.
In this article, we will use the newer Data > From Web technique.
This will save you a lot of time and deliver far cleaner results in your excel sheet.
Instructions may vary on the internet as to how to do this, due to older versions of Excel wording buttons in a different way. This tutorial uses the latest version of Excel (when this article was written in 2023).
Quick Guide – Import Table Data From Web
Table Data From Web to Excel
- Copy URL of website that has the table
- Excel > Data Tab > From Web > Paste URL
Detailed Guide – Import Table data From web
Step 1: Launch Excel and Create a New Worksheet
Open Microsoft Excel from your Office 365 suite and create a new worksheet by clicking on the “+ New” button or pressing Ctrl+N. A blank spreadsheet will appear.
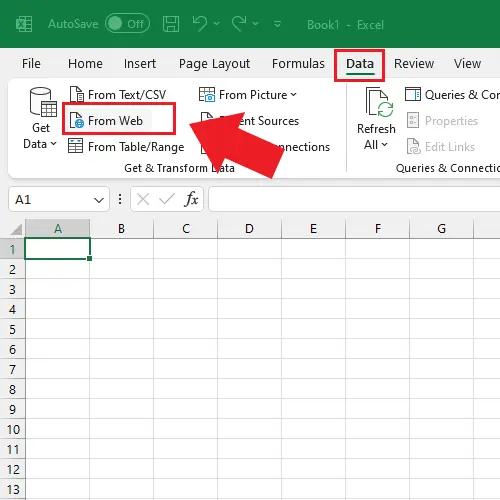
Step 2: Access the “Data” Tab and Select “From Web”
In the Excel ribbon, navigate to the “Data” tab. Look for the “Get External Data” group and click on the “From Web” button. A new dialog box titled “New Web Query” will appear.
Step 3: Enter the Website URL
In the “New Web Query” dialog box, enter the URL of the website containing the desired table.
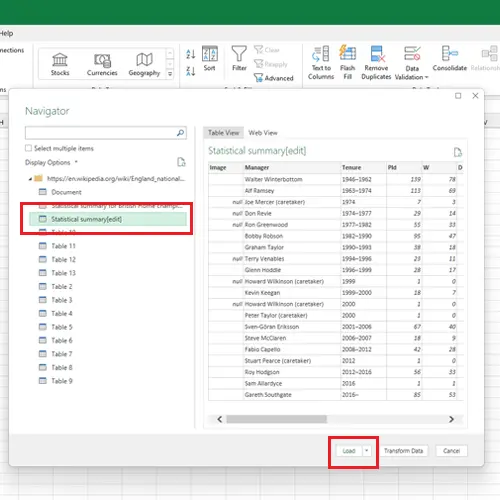
Basic is the default selection, that’s fine. Paste the URL of the website that contains the table.
In this example we’ll use a Wikipedia page with England football managers.
The first time you do this, it may appear to hang for a few seconds. If it hangs indefinitely then please see troubleshooting below. (Scroll down to troubleshooting – Data from web – sticks on connecting).

Step 4: Select the Table for Import
Excel will load the website and highlight any tables found on the page. Review the available tables and click on the table you want to import. Once you have picked your table, click Load.
Step 5: Refresh Data (if necessary)
If the source website’s data is dynamic and frequently updated, you can choose to refresh the imported data. Right-click anywhere on the imported table and select “Refresh” from the context menu. This will ensure your Excel table reflects the latest information.
Step 8: Manipulate and Analyse the Imported Table
With the website table successfully imported, you can now manipulate and analyse the data using Excel’s powerful features. Apply formulas, perform calculations, sort and filter the data, or create charts and graphs to gain valuable insights.
Once you are happy, copy and paste into the project sheet or PowerPoint file that you are working on.
Just How Easy Was That?
By utilizing the “Data > From Web” feature in Office 365 Excel, importing website table content becomes a seamless process for beginners. This step-by-step guide has equipped you with the knowledge to extract and analyse data from websites directly into Excel spreadsheet. Take advantage of this powerful tool to enhance your data analysis capabilities and unlock new possibilities in your work.
Troubleshooting Excel Stuck On “Connecting” Data From Web
To fix a problem with Data > From Web hanging on Connecting, follow these steps:
Excel / Data / Get Data / Query Options
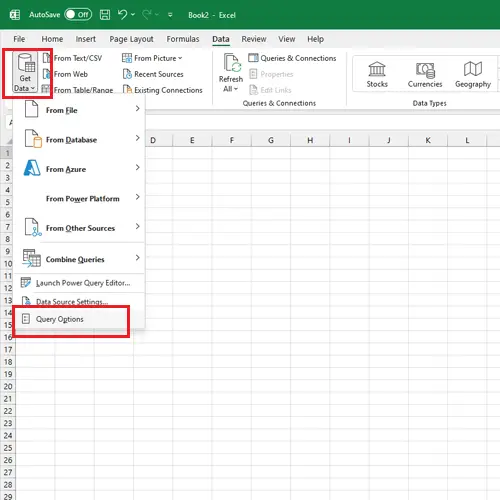
Within Query Options select Security and tick None in Certificate Revocation.

This problem is caused by websites having outdated or no security certificates.
Video Instructions Of This Article
End