
If you are running some older software applications on Windows 10, you may be prompted to “Download & Install .NET Framework”.
Some software programs might insist that a particular version of .NET Framework is installed.
However, when you attempt to download and install the older .NET Framework 2.0, 3.0 and 3.5 versions, Windows cannot install because a “newer version is already installed”.
In this article we will cover the instructions to enable the older legacy versions.
What Is .NET Framework?
Think of .NET Framework as a computer language translator. Applications that have been written in different coding methods are handled by .NET Framework to turn it into a “machine code” that the computer can understand. The correct term is Common Language Runtime (CLR). It is a background engine that handles a huge list of essential processes that software programs require to run.
Instructions To Enable .NET Framework Older Versions
Download & Run .NET Framework 2.0, 3.0 & 3.5 on Windows 10
- Open Windows Features
In the search bar, type windows features. (Make sure that you are connected to the internet before proceeding).

- Enable .NET Framework 3.5
Version 3.5 includes 2.0 & 3.0. Select the main box to ensure that there is a black box in there.

- Follow Onscreen Instructions & Reboot
By selecting this box, Windows will download any missing or required files from the Windows Update servers. Simply follow the on-screen instructions and reboot on completion.
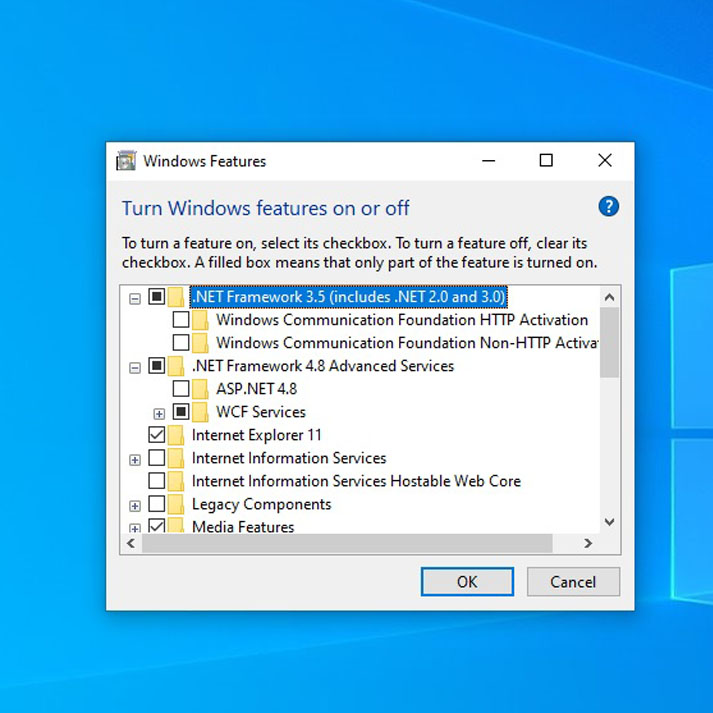
Do not worry about the Windows Communication Foundation or ASP.NET 4.8 boxes. As long as the main 2 boxes are selected (as pictured above), you have enabled the legacy versions of the framework. (Changes will not take effect until after you have rebooted the computer).
If Problems Occur
If you find that the box is already selected, un-select it and try again.
If Windows is unable to download required files, check your computer is up to date and run the Windows Update Troubleshooter by going to Start / Settings / Update & Security / Troubleshoot.
Install Offline (Advanced Users)
If your system is offline, you will need to have your Windows installation media (USB or DVD). The required files are all on there.
The path to the Net Framework folder is \sources\sxs\microsoft-windows-netfx3-ondemand-package~31bf3856ad364e35~amd64~~.cab
Running Windows Powershell or Command Prompt (as Admin), the following code should be entered to manually install this feature offline straight from your installation media:
Dism /online /enable-feature /featurename:NetFX3 /All /Source:E:\sources\sxs /LimitAccess
Change the letter E to the letter of the path to your drive.

Key Points To Cunclude
In conclusion, installing the .NET Framework 2.0, 3.0, and 3.5 in Windows 10 can be a straightforward process when following the right steps. The guide provided in this article has outlined the steps in a clear and concise manner, making it easy to follow along. By following the instructions, you can ensure that your Windows 10 computer has the necessary components to run applications that require the .NET Framework. If you encounter any issues or errors during the installation process, refer back to the guide or consult Microsoft’s official documentation for additional support.
The Video Version Of These Instructions
This video is part of a series that we are compiling for YouTube called “Straight to the Point Tutorials”. “How to” instructions – without all the faff!
Click here to visit the Computroon channel over on YouTube.
Reference Links to .Net Framework
Lean .NET (Microsoft documentation)
https://learn.microsoft.com/en-us/dotnet/
Build a C# .NET Application in 60 Minutes (Video Tutorial from Traversy Media)
YouTube: Build a C# .NET Application in 60 Minutes